Importing Annotations to Training Sessions
Annotations are a valuable source of information for whole slide images.
Not only can human-made annotations draw Users attention to specific parts of an image without needing someone to directly show it, but annotations are also frequently how AI analyses are exported and displayed.
Thankfully, Pathotrainer is extremely adaptable when it comes to displaying your Annotations or making new ones.
Existing Annotations
If you have imported annotations for a particular file using API calls into PMA.core, or via our Life Sciences software PIMSls, then images with existing annotations will be detected and the option to toggle them on and off will appear automatically in the top right of the viewport in a training session.
It doesn't matter if they are Third-Party (e.g. Halo, Visiopharm…) or made in Pathomation software, all detected annotations for that image in that folder will appear.
You can also adjust the opacity of annotations using the slider bar underneath the name.
Native annotations made using a Pathomation product e.g. PMA.studio, Pathotrainer will be listed as ‘NativeAnnotations’:
Third Party annotations will recognized and toggleable by ‘brand name’ e.g. Aperio:
Some types of annotations such as Visiopharm have multiple ‘classes’ of annotations which can be individually toggled on or off:
What If I Don’t Already Have Annotations?
If you don’t already have annotations, you can make in your preferred Pathomation software such as PIMSLS, or in PathoTrainer directly.
In PathoTrainer, when you are Creating a Case Collection or Editing an existing one, you can click on the image or the Annotations button for an image in a case to modify annotations:
Clicking either will take you to the image configuration menu. Here you will find a few tools:
- The image bar along the top which allows you to navigate between different images in a case
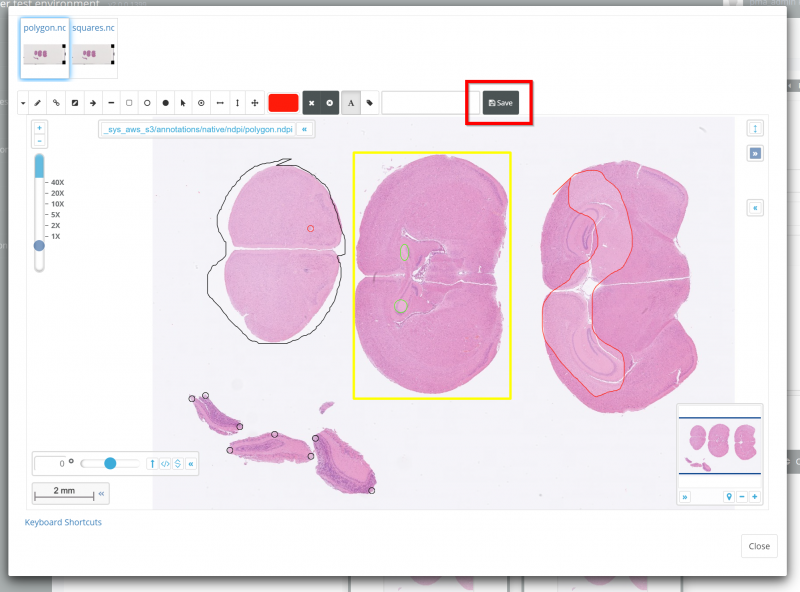
- The annotation toolbar which you can use to make your own annotations
- The image viewport where you can inspect and edit the image selected in (1)
- The existing annotations menu box where you can toggle on/off the visibility of existing annotations using the checkbox and adjust their opacity using the slider bar – please note this does NOT affect how they will appear in a training session to an end user – they will be able to toggle on/off the annotations and adjust the opacity themselves.
When you are done editing your custom annotations, be sure to hit save.
My Image Has Annotations But I Want To Hide Them For A Training Session
Not a problem - check out custom interaction modes to define an interaction mode in which only annotations made in your session will appear


