Quickly Creating Subfolders for Adding Multiple Cases
Case collections are the way to organize your WSIs to be shown in training sessions. Once you've made a Case Collection all the slides within it can quickly be added to as many training sessions as you like.
Sometimes you may find yourself in a situation with a lot of 'loose' WSI files in a folder, and you want to quickly put each one in it's own Case subfolder.
Thankfully, we've written a quick script for Windows Command Prompt that will help you get your WSIs in an organised state.
If you're using a filetype with just one file per WSI e.g. .dcm, .ndpi:
Step 1: Open Command Prompt (type CMD into the windows search bar and open the app)
Step 2: Navigate in Command Prompt to the folder with the WSIs. This is done by typing “cd” and then pasting the path to the folder. Then press enter.
Step 3: Now that you're in the right folder, copy and paste: for %i in (*) do mkdir “%~ni” then hit enter. Running this command will make a subfolder for every file, with the same as the file.
Step 4: Copy and paste then enter: for %i in (*) do move “%i” “%~ni”
If you're using a folder-based filetype e.g. .mrxs that has a folder and a file with the same name
Step 1: Open Command Prompt (type CMD into the windows search bar and open the app)
Step 2: Navigate in Command Prompt to the folder with the WSIs. This is done by typing “cd” and then pasting the path to the folder. Then press enter.
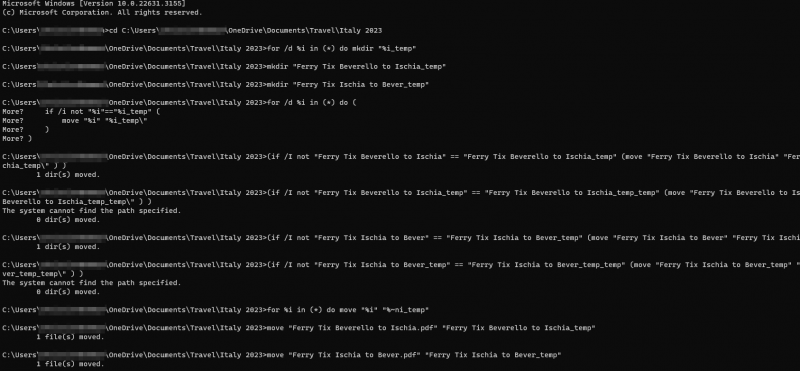
Step 3: Now that you're in the right folder, copy and paste: for /d %i in (*) do mkdir “%i_temp” then hit enter. Running this command will make a new folder for every folder in the directory, with the same name as the folder + “_temp”.
Step 4: Copy and paste then enter:
for /d %i in (*) do (
if /i not “%i”==“%i_temp” (
move “%i” “%i_temp\”
)
)
This will copy all your existing folders into the newly created “_temp” folders.
Step 5: Copy and execute for %i in (*) do move “%i” “%~ni_temp”
This will move all the loose files into the directory with the same name plus “_temp”
Please note that:
- You can adjust the three “_temp” in all three commands to whatever addition you'd like, however it must be exactly the same for all three commands.
- This script only works when the folder and the file both have exactly the same name - if this is not the case you will need to devise a custom script as we cannot anticipate all naming conventions.
- If you have multiple WSIs that have to go into the same case, you will need to devise a custom script as we cannot anticipate what your combination of WSIs per case is.

