User Tools

Site Tools


how_to_use_the_dicomizer_tool_for_anonymisation

This is an old revision of the document!


DICOMizer tool instructions

This guide explains step by step what you need to do to convert any type of whole slide image in a DICOM format and remove all identifiable data. You need to have PMA.start and the DICOMizer software installed on your pc. Look for these logo’s:

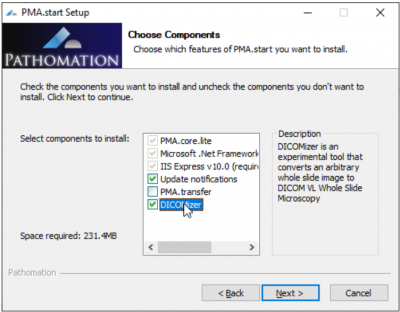
If you don’t have PMA.start or the DICOMizer tool installed follow these steps. The Pathomation DICOMizer is currently available on Windows only (other platforms pending) and can be downloaded here: https://free.pathomation.com/download/ Make sure the DICOMizer is selected

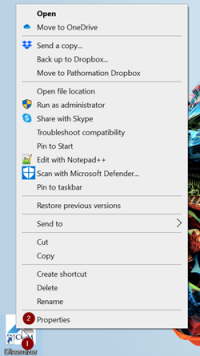
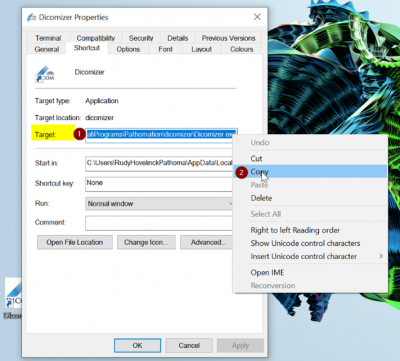
The DICOMizer software runs as a command prompt. You will need to type a ‘Dicomize’ command. There are 3 important lines of text to type: 1. the location of the DICOMizer software 2. the location of the file you want to convert 3. where you want the resulting image to be stored. To establish the location of the DICOMizer tool on your pc: right-mouse click on the DICOMizer icon, then click properties, in the properties popup window, you can copy the target file with a right mouse click and then copy it.

Paste the program file link in a text file for future use, it should look similar to this example: c:\Users\RudyHovelinckPathoma\AppData\Local\Programs\Pathomation\Dicomizer\Dicomizer.exe

Next you need to know the location path of the images you want to DICOMize. Open the folder on your local disk drive where your slides are located. This is a good moment create a folder where you want the DICOMized images to be stored.

In the example below we will describe how to DICOMize the image ‘TIN1’ and store the DICOMized image in the folder ‘Dicom’

Next open ‘TIN1’ (1) in the PMA.start viewer, you can see the location of the image to be DICOMized in (2), select the path text and copy it (eg Ctrl-C). Paste the image file link in a text file for future use, it should look similar to this example: c:\Users\RudyHovelinckPathoma\OneDrive - Pathomation\03 Pathomation\SLIdes\TIN 1.svs

Next open the folder where you want the resulting DICOMized images to be stored, you can see the location of the folder by selecting the folder header text and copying it with a right mouse click and the copy function in the menu. Paste the image file link in a text file for future use, it should look similar to this example: C:\Users\RudyHovelinckPathoma\OneDrive - Pathomation\03 Pathomation\SLIdes\Dicomized slides

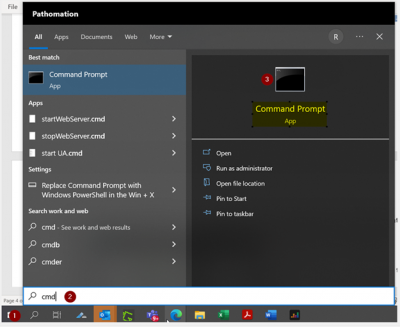
Next you need to run the tool through the command prompt. Type ‘cmd’ in windows start. You will see the command prompt app, click on it to start.

The Command Prompt screen will open

Now you need to combine the location information. Type this instruction: c:\Users\RudyHovelinckPathoma\AppData\Local\Programs\Pathomation\Dicomizer\Dicomizer.exe “c:\Users\RudyHovelinckPathoma\OneDrive - Pathomation\03 Pathomation\SLIdes\TIN 1.svs” “C:\Users\RudyHovelinckPathoma\OneDrive - Pathomation\03 Pathomation\SLIdes\Dicomized slides” It is very important to put the file location and destination between “ ” and have a space between the 3 text lines You can add several images you want to DICOMize at once type one after the other, again do not forget to add “ before and after every file name.

how_to_use_the_dicomizer_tool_for_anonymisation.1666258552.txt.gz · Last modified: 2022/10/20 12:35 by rudy